Let me admit very clearly that I’m not a Painter or Scratcher or not even an Artist; I love to introduce myself as a Photographer. I never felt to turn my passion. I’m happy that my photos look like photos.
But then, when I saw the techniques which were inaugurated in Photoshop to simplify the transformation of a photo into a painting! Seriously, I never thought someday I would say “OMG”, it’s so damn simple.
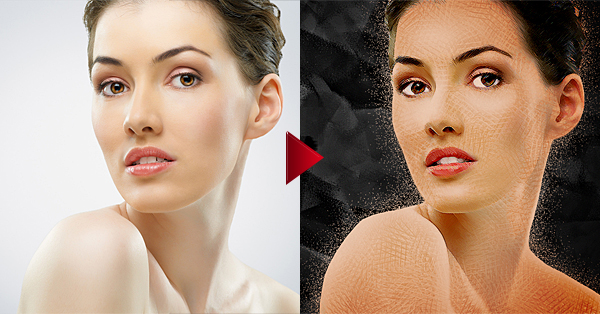
That’s why people like to say Photoshop isn’t just about slimming down celebrities! It’s a great asset and can do a whole lot of amazing things.
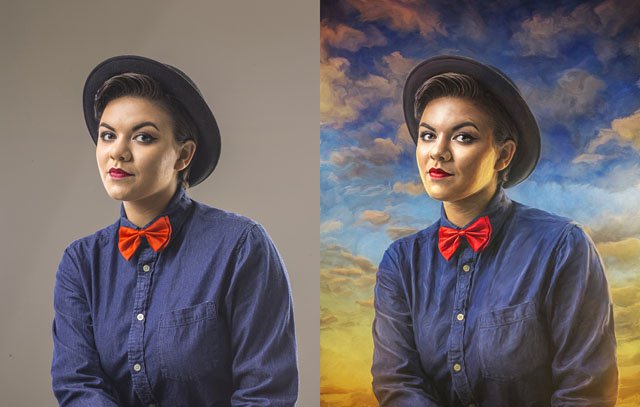
I did that experiment and successfully turn my click into realistic art. It added a painterly feeling which brought me absolute pleasure.
I know like me, not everybody is a painter; but in deep heart, you must also want to turn your work into Picasso! The good news is; today’s advanced tech has reduced the hassle of this daunting task. And the bad news is; wrong hand can turn the creation into worst than ever.
Well, to simplify the process I’m going to describe the exact principles those I followed. These guidelines possibly can open up your imaginary mind and turn your images in an artistic manner.
Step-1: Preparing Your Photo:
First import the image you want to convert. The process is slightly different for Photoshop and Lightroom. I’ll cover the Photoshop here.
Follow the steps if the image isn’t open.
File>Open as Smart Object>soon-to-be-painterly photo
But if the image is already opened in your software, then click Layers>Smart Object>Convert to Smart Object
Step-2: Five Filters Settings:
Adobe regularly updates the software and as of writing these guidelines, the Filter menu is already been shortened. But no worries; still you can access this handy function.
Click “Filter” then select “Filter Gallery”. In CC the process is bit different.
Click Preferences>Plug-ins>Show all Filter.
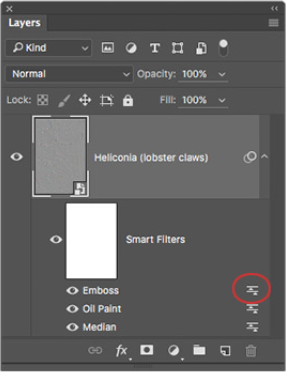
View your layer panel. Do you see individual filter names? That’s the benefit of this setting.
First Filter: Though entirely you are roughing up the image to give a painted look, the end result must not look unnatural. This is what the first filter does. The settings go like bellow.
• Filter>Noise>Median
• Click on preview
• Set radius to 3 pixels
Second Filter: Now you need to adjust Oil paint filter. To open the filter click Filter > Stylize > Oil Paint. From the window, I usually fix settings like the bellow.
• Preview clicked
• Brush Stylization-6.3
• Cleanliness- 10.0
• Scale- 10.0
• Bristle- 10.0
• Unchecked lighting
Here the filter might be dimmed (The problem for which I got annoyed). To fix it you must have to turn on “Use Graphics Processor”. The path is Photoshop > Preferences > Performance.
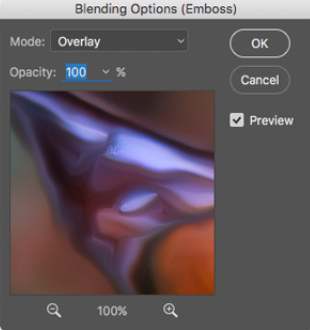
Third filter: Here the task is to fix the Emboss filter. To open click Filter > Stylize. Fix angle to -130, heights 3 pixels and amount 100.
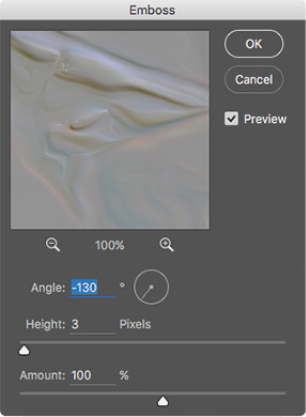
After these settings, I got annoyed because the entire documents turn into gray color. I talked to online community sharing the artwork and finally could fix the issue.
So don’t be scared, it will be fixed in the next very step.
Did you notice when you clicked “Emboss”, layer window opened? So double-click on that panel where I marked in bellow snap. A new window opened as “Blending option”.
Now set mode as “Overlay” and opacity to 100%. Don’t forget to click on the preview option.
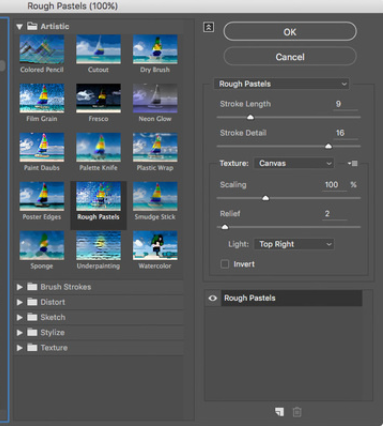
Fourth Filter: Now it’s time to set the “Rough Pastels”. To open the filter click Filter > Artistic. A filter gallery will be emerged. What I fix are:
• Strokes length to 9
• Stroke Detail: 16
• Turn on the “Canvas” in “Texture”
• Drag “Scaling” to 100% and “Relief” to 2
• Select “Top Right” on “Light” Section
• Turn off the “Invert”
• After finish click ok.
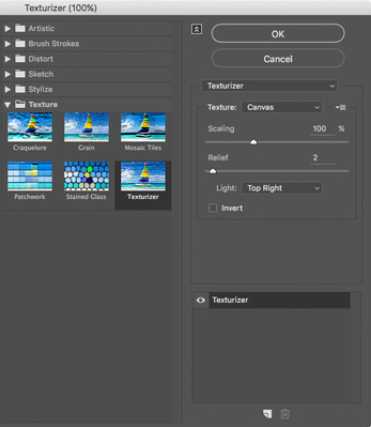
Fifth Filter: The last filter you need to fix is “Texturizer”. To drag this filter click Filter > Texture > Texturizer.
Before clicking okay you have to fix certain value in Filter Gallery dialog. (Pretty much same as the previous step)
• Turn on the “Canvas” in “Texture”
• Drag “Scaling” to 100% and “Relief” to 2
• Select “Top Right” on “Light” Section
• Turn off the “Invert”
• After finish click ok.
Finalizing the retouching:
Your art is almost ready. But before you close your Photoshop, recheck what you have done and edit if things need further sharpness. If you need any adjustment just double-click the filter name from the panel.
You also can raise or reduce the painterly effect of your masterpiece, even to a particular portion of the image. Amazing right? Just follow the below steps.
1. Click filter mask and activate
2. Click Brush Tool
3. Set foreground color chip to black
4. Set Opacity of Brush on how much you need the effect
5. Brush the portion of the image where you want the more painterly look
Note: To fix painterly color, set black to cover up and white for the reveal
After finishing the process, click okay and recheck again and go back to the previous step if you need further editorial work.
Once you are satisfied, save the image. Here I always save the raw files so that I can do the further editorial task.
These principles work on all types of images. Next time when you are up to uplift your creativity, get your PC and select an image you want to turn into a masterpiece art.
Let your imagination run wild and create some extraordinary “cry shots” with terrific artwork. Experiment and share your views on the below comment box.
Once you’ve created a digital painting from your photo you might considering having Bumblejax create a gallery quality masterpiece on acrylic, bamboo or canvas.